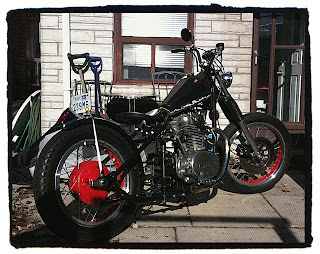
This is a quick DIY for those with longer swing arms or stretched hardtails.
I have noticed quite a few threads on the subject but never a How To on the subject. So this is my contribution to the site. Enjoy.
You will need 1/4" steel rod in the appropriate length you are requiring.
This can be Stainless if you plan not to paint or powder coat or even polish as it will come up like chrome with some elbow grease.
First You need to take some of the stock parts that are going to be used on the new brake rod.
The clevis needs to be removed from the old brake rod by cutting the rod in half and then spreading the end of the clevis so that you can slide it off.
You also need to keep the end spring, adjuster Nut and lever Pin as well as the actuator arm obviously.
On to making the new rod.
First you will need a couple threading dies for the rod. I used a 1/4" any pitch thread just to turn down the end of the rod enough so that you will be able to start the M6x1.0 (insure to use a lubricate of some sort it will save your tools and make the job easier)
Cut the thread cut into the rod the same distance and the old thread plus the distance to the old spring stop. You will be adding a nut here to act as the new spring stop. (I made sure to Locktite it you can give it a quick spot weld if you wish.
You can now assemble this end to insure it all fits together nicely.
Now you can get to the other end. Now you need to mark where the rod needs to be bent to hold the clevis in the correct location for the length you need for your brake. I used a sharpie to mark this.
Make sure to drill out the old clevis with a 1/4" bit so that it slips over the new rod.
I then bent the rod end at the desired length(make sure the clevis is on the rod before bending.
Then cut it as square as possible.
You can now slide the clevis back and pinch it closed over the end of the rod.
I will be tacking a couple welds here to make sure it's not going anywhere.
Enjoy your new brake rod.
Please feel free to share this with anyone in need.
Saturday, 1 October 2011
Saturday, 6 August 2011
My Chopper build: Last Caress
I started with a $300 1977 basket case from my buddy Kevin Nov of 2009. Almost 2 years in and i'm almost done what I figured would be done for spring 2010.
There have been a number of people that have helped me with this and here is the list.
-Kevin for his offering me the bike when he knew he wasn't going to have the time to do what he would like to.
-Scott for getting me into his shop to use the sand blasting room, helping with cutting and prepping the frame for the hardtail, getting rid of all the unneeded tabs and having their welder do an awesome job attaching the TC brothers hardtail.
-Glen for his welding assistance getting the foot peg mounting bolts, tank, seat mounts and rear brake stay and lots of great advice.
John for helping me get the motor and frame up from the basement
And Most of all my wife Rose for stickin with me and not being one of those people who doesn't support what they are doing after their husband changes the direction the bike is taking multiple times ;)
Here is what I started with.
Yes that's an entire XS650 in the back in pieces.
I polished up the old wheels and relaced them and had Jay Lin true them up for me.

Our newest family member Max with my awesome wife Rose.
And She is alive!!!!
Subscribe to:
Posts (Atom)


